Thursday, 27 June 2013

Using SSH with the desktop GUI for local networking.


For some reason, my laptop wouldn't connect to my tv pc (laptop: Cinnamon 15, tv pc: Mint 14) yet would sort of see and allow access to the other pc's running windows (albeit VERY limited cheers Billy boy Gates!) so I had a scour on the net as I had seen about SSH etc.

After a while I came across some info regarding using SSH for local network access that just required a program called: openssh-server

install via: sudo apt-get install openssh-server

Once installed on the target pc, thats it! no configuring at all.

To access the tv pc, all I needed to do was under 'File' on any open file view window, click 'Connect to Server'

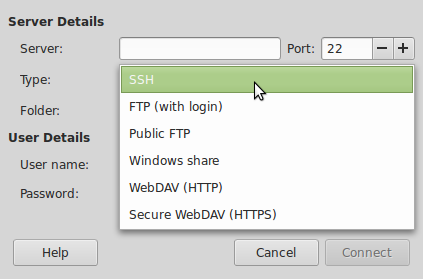
That will open a dialog box asking for Server details.
Under 'Server' enter the IP address for the target machine and change the 'Type' to SSH.

I left the 'Folder' option as is and for the user name and password, I simply used the name/pass for the main user account of that pc.


Click the 'Remember this password' if you want it to remember (Even though, I found when I connected  it still asked for the password etc, but  on the following dialogue box, there are more options for remembering the password.


Once done, click 'Connect' and it should open a window with the files of the other pc and also, because we are connected as the user for that machine, we get full access to that users home folder and files :D

One thing I also did was to navigate the the home folder where it had a folder for the user and simply dragged the folder icon to the left side panel which created a nice permanent short cut to my navigation panel, so whenever I need to connect to it again, I just simply click the icon.


Extra note:

The other evening I needed to shut down the tv pc and as the wireless mouse/keyboard wasn't at hand, I thought id try connecting to it via a terminal using the SSH command, and with simply typing:

ssh tv@192.168.1.111

It asked for the users password which once entered gave me a command line access to the tv pc and a quick 'sudo shutdown -h now' command the pc turned itself off (hmmm... couch & potato spring to mind here lol!!!)

I am currently trawling through the myriad of windows ssh servers to find one that you don't need a PHD to actually get working, so once I sort one out, I will add to the blog.



Sunday, 23 June 2013

AccuWeather Desklet location settings.

Update 04/02/14.

A fellow G+ user wrote that the desklet now says that the subscription has expired and mine has done the same.
A couple of guys (will add their names when I do eventually get back on my laptop) have both told me that if you remove and uninstall the weather app and redownload it, it fixes the blank window/expiry problem. I have yet to test it myself as not been able to get sat down with my laptop but both independent answers both gave pretty much the same solution.

Mark.

-------------------------------------------------------------------------------------------------------------------


I thought I would spruce up my desktop a bit and have a look at some of the Desklets that are available for Cinnamon and saw the AccuWeather desklet and installed it.
The problem I came across was that when I entered my location, it said that it didn't exist! The default location is in Romania and the layout was a bit odd looking:

EUR|RO|RO037|TARGOVISTE

So by looking at the default setting I could work out the EUR = Europe, RO = Romania and the TARGOVISTE was the town/city, but wasn't sure what the RO037 was so I nipped onto the AccuWeather website and entered my town and country like I have done on my Android phone and XBMC (ie. Cleethorpes, UK) and it located it and displayed the current weather (depressing as per usual lol!)
I then noticed in the URL address, it had the postcode for the area so entered the following into the Desklet settings for location, and viola! the town I live in now exists! :D

EUR|GB|DN35-8|Cleethorpes


(Here is the original URL for the AccuWeather website so you can see the layout)

http://www.accuweather.com/en/gb/cleethorpes/dn35-8/weather-forecast/325028

Note the gb for Great Britain, and the dn35-8 for the postcode range for our area.


So hopefully this little post will help anyone else like myself who was wondering how to layout the location structure.


Update:

Thanks to Daniel for pointing out that using the web browsers url info as above doesn't work for all places strangely, but a little bit of investigation brought this to light:

Enter this into your browser and add your location at the end, then in the XML list that gets displayed use the codes at the end of the line within the ""s where it says LOCATION and that SHOULD work for everyone.

URL to copy: http://thale.accu-weather.com/widget/thale/city-find.asp?location=

Note:

I don't know if it's just me but has anyone else noticed that when you have the weather desklet running your machine locks up randomly? It has done it a few times for me so for now ive removed the desklet. :(

Wednesday, 19 June 2013

Kill dead app & shutdown when completely locked up

I thought I would put this little snippet I picked up as I have managed to lock up my linux a couple of times and found out pressing the power button isn't recommended so came across this to safely shut down the pc even when it seems completely locked up.

Press and hold: Alt+SysRq then type in REISUB (fixed as had wrong order!)

Your pc should then nicely reboot :) (Phew!)

Sometimes I have found a program hangs and just sits there and no matter what you do it refuses to close etc. I found online someone mentioned about assigning a custom key shortcut to initiate xkill which you can use to force a program to close.

In the System Settings, goto Hardware then keyboard.
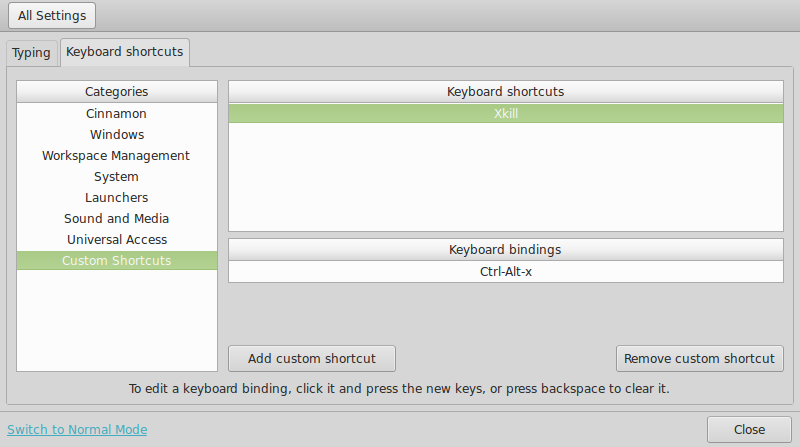
Click the Keyboard shortcuts tab, then click add custom shortcut.

In the window that Opens, type in Xkill into the name field, and then type xkill (note case) into the lower field then click ok.

Next click on the keyboard bindings, and now you press and hold the key combination you want to use to initiate xkill (I used Ctrl+Alt+x)


Thats it, so whenever you get a stubborn frozen program, hit your key combination and your cursor will change into an X, simply click anywhere in your frozen program to close it.

Quick video added of custom key setting for xkill.

Tuesday, 18 June 2013

TrueCrypt for keeping your files from prying eyes.


Most of us find sometimes we have files that we would rather not have other people seeing especially if you have a shared computer that the rest of the family use, especially if you have young children who could easily accidentally delete work files etc.

I recently came across a program called TrueCrypt which offers secure encryption for your files.
You can create a file that behaves just like a drive or you can even use an entire disk or partition to secure your data. If you use an entire hard drive, you can even create an encrypted partition that also includes an 'extra' hidden partition that wont show up even if someone learns your password for the initial encrypted partition.

I've tested both the encrypted file mode and also the partition types and they behave just like a normal drive to store data.

To install the software, simply goto:  TrueCrypt website and choose the version you want (I went for the standard X64 package) then double click the file to install the software. Once installed it will appear under the Accessories panel in your menu.

It is a very user friendly program and setting up a volume is simply a few clicks and your away.


Monday, 17 June 2013

XBMC Media Centre


One of the first things I installed when I installed Linux was XBMC as it is an awesome media centre for both local content (video's, pictures, music etc.  and also web based media playback) and works great for our pc under the TV so the whole family can watch things together.

Unfortunately, XBMC isn't in the software manager, so I had to find how to install it from the terminal (I used to struggle with installing from terminal in the old days as it always wanted you to compile from source etc, and 95% of the time I had dependencies missing etc and no clues where to find them!)

As it turned out, it was MUCH easier than I expected and only takes a couple of lines in the terminal.

First, we need to add the repository which is done with:
sudo add-apt-repository ppa:team-xbmc/ppa

Once that has completed, we update the package list with:
sudo apt-get update

And to finally install the software, we simply enter:
sudo apt-get install xbmc

Once completed, the XBMC icon will be automatically added to your Sound & Video menu.
No compiling, no hassles!
In a later post, I will write a guide on how to add additional 'add-ons' for streaming video's on-line.

Hopefully anyone trying this won't have any problems as I have installed XBMC on two different machines and both installed without a single hiccup.

To remove XBMC (possibly if you want to upgrade) then simply enter:
sudo apt-get remove xbmc


Welcome to my Linux Mint 15 Cinnamon blog

Hi and welcome to my new blog for anything and everything to do with Linux Mint 15 Cinnamon.

After buying a new laptop recently and not getting on with Windows 8, I bit the bullet and wiped it off my drive and installed Linux Mint and realised it was the best thing I could have done!

I have tinkered with Linux on and off over the years, but I always seemed to come unstuck with getting my head around the inner workings etc and always retreated back to windows.
This time though, I am sticking with Linux as today's releases are a LOT more user friendly than they used to be.

I also have a pc used for a media player under our TV which at the moment is running Linux Mint 14 Mate, but when I get time I will be upgrading it to Mint 15 Cinnamon.

So hopefully as I learn new things, I will add them to this blog so that other newbies can learn at the same time.

Enjoy your stay, and hopefully we can all learn together and enjoy been windows freeeeeee :)

Mark.